Next.js+Supabaseで認証機能を実装しよう【コード付き完全ガイド】
- 土門 大貴
- 記事制作日2024年1月2日
- 更新日2024年1月2日

- 1いいね!
今回ご紹介するのは『Next.js』と『Supabase』を併用する場合、どのように認証機能を実装することができるか、についてです。
この記事にかかれているとおりに実装していただければ、安全に素早く認証機能を用意することが出来ます。
サインイン、サインアップだけでなく、パスワードを忘れた際のパスワード再発行機能を一から作成するので、『Next.js』や『認証機能』について勉強中の方も、ぜひこちらを読んで仕組みを学んでみてください。
事前準備
①:Supabaseプロジェクトの作成
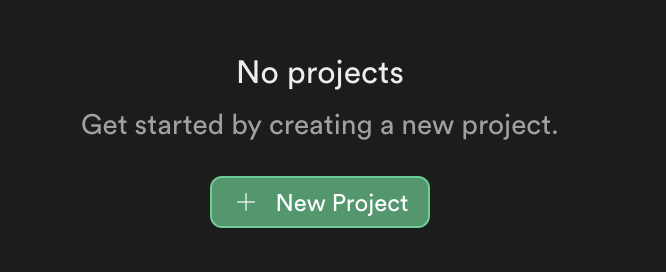
Supabaseにログイン(登録していないければアカウント登録から)して、
トップページの「New Project」を押します。
すると、下記の様な画面が表示されます。
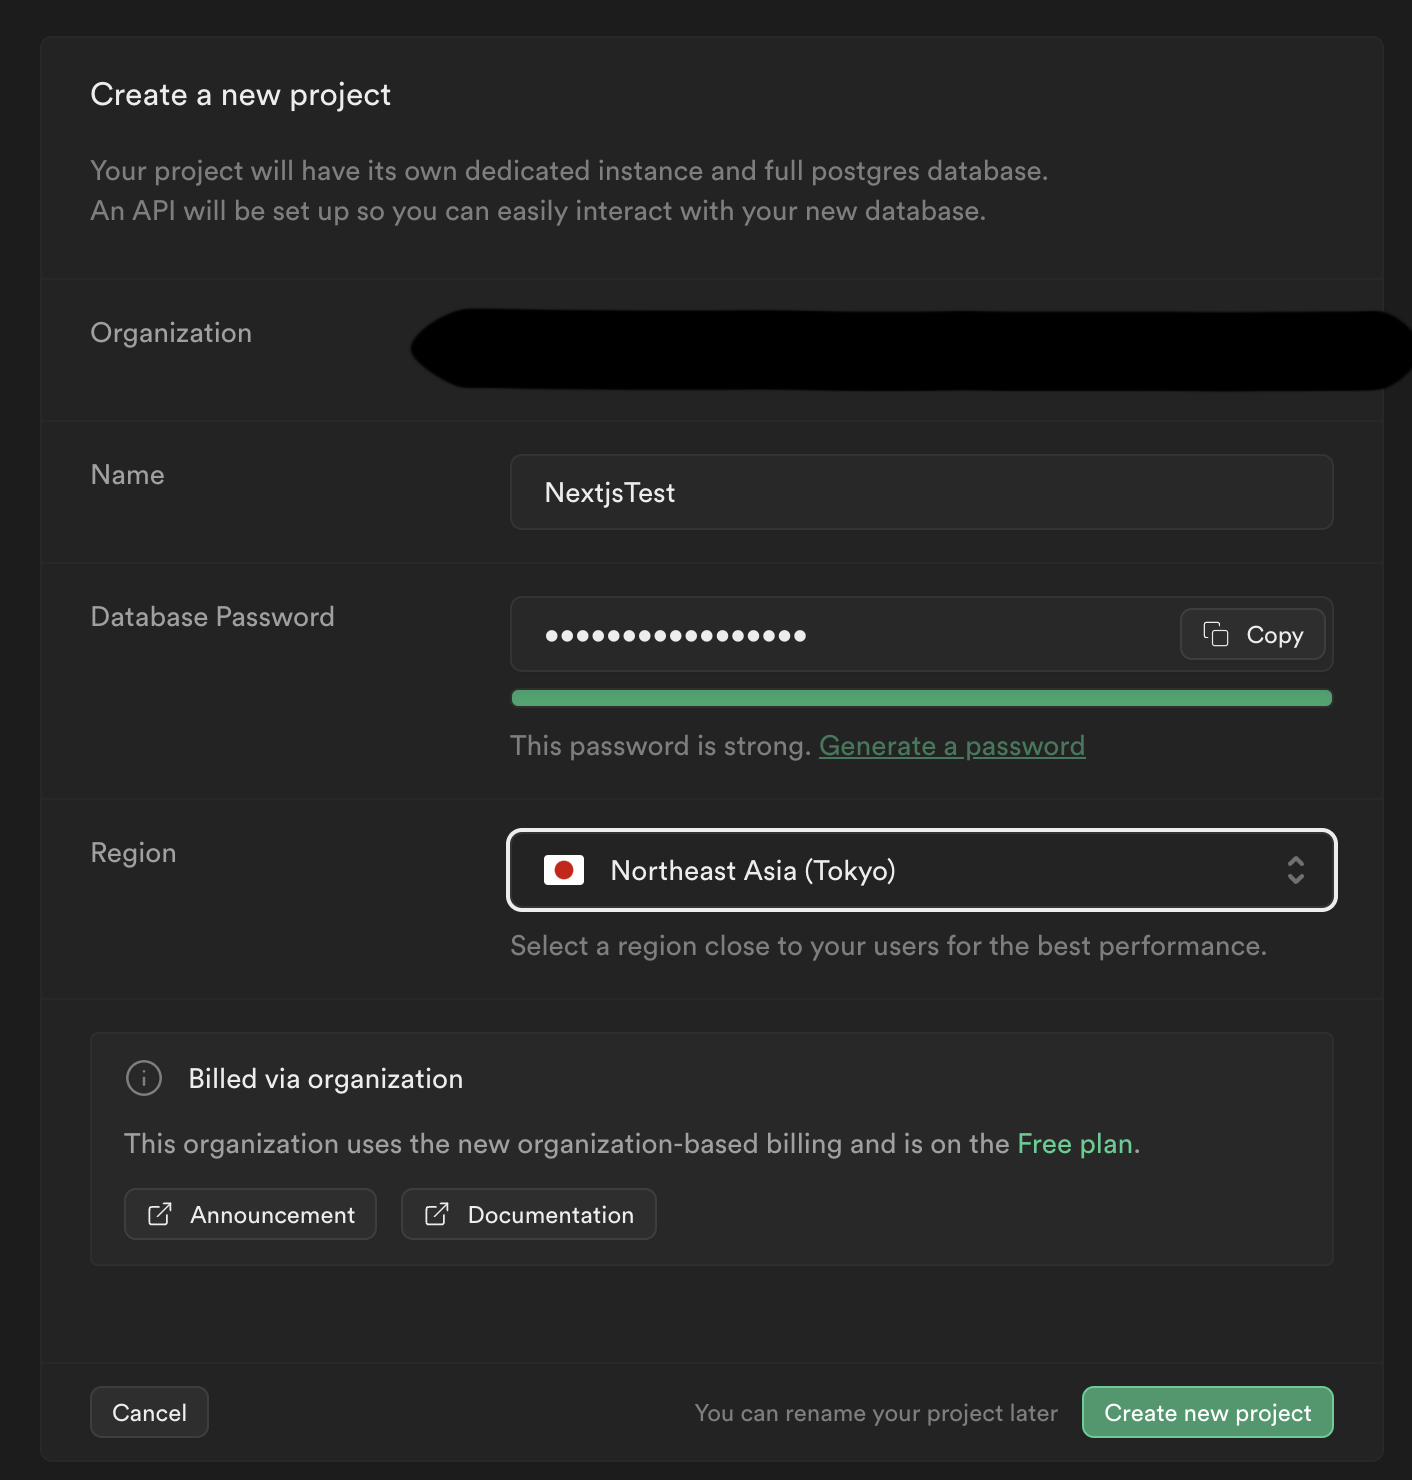
適当なプロジェクト名とデータベースのパスワードを入れてあげてください。
Regionはできれば自分の住んでいる地域の近くがいいため、日本で設定するのがいいと思います。
②:Next.jsプロジェクトの作成
任意のディレクトリで、npx create-next-app -e with-supabaseと打ち込み、
対話的にアプリケーションの名前の設定をしてプロジェクトの作成を行いましょう。
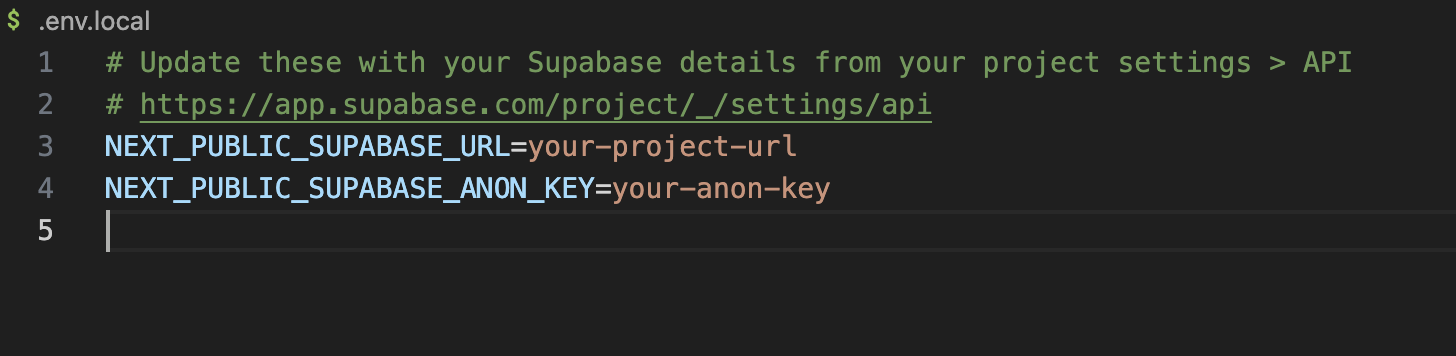
次に環境変数の設定を行います。
作成されたNext.jsプロジェクトの直下に.env.local.exampleファイルがあるので、
このファイルを.env.localにリネームし、
SupabaseのサイトのProject Settings→APIにある、Project URLとAPI Keyをそれぞれ添付画像の変数に設定してください。
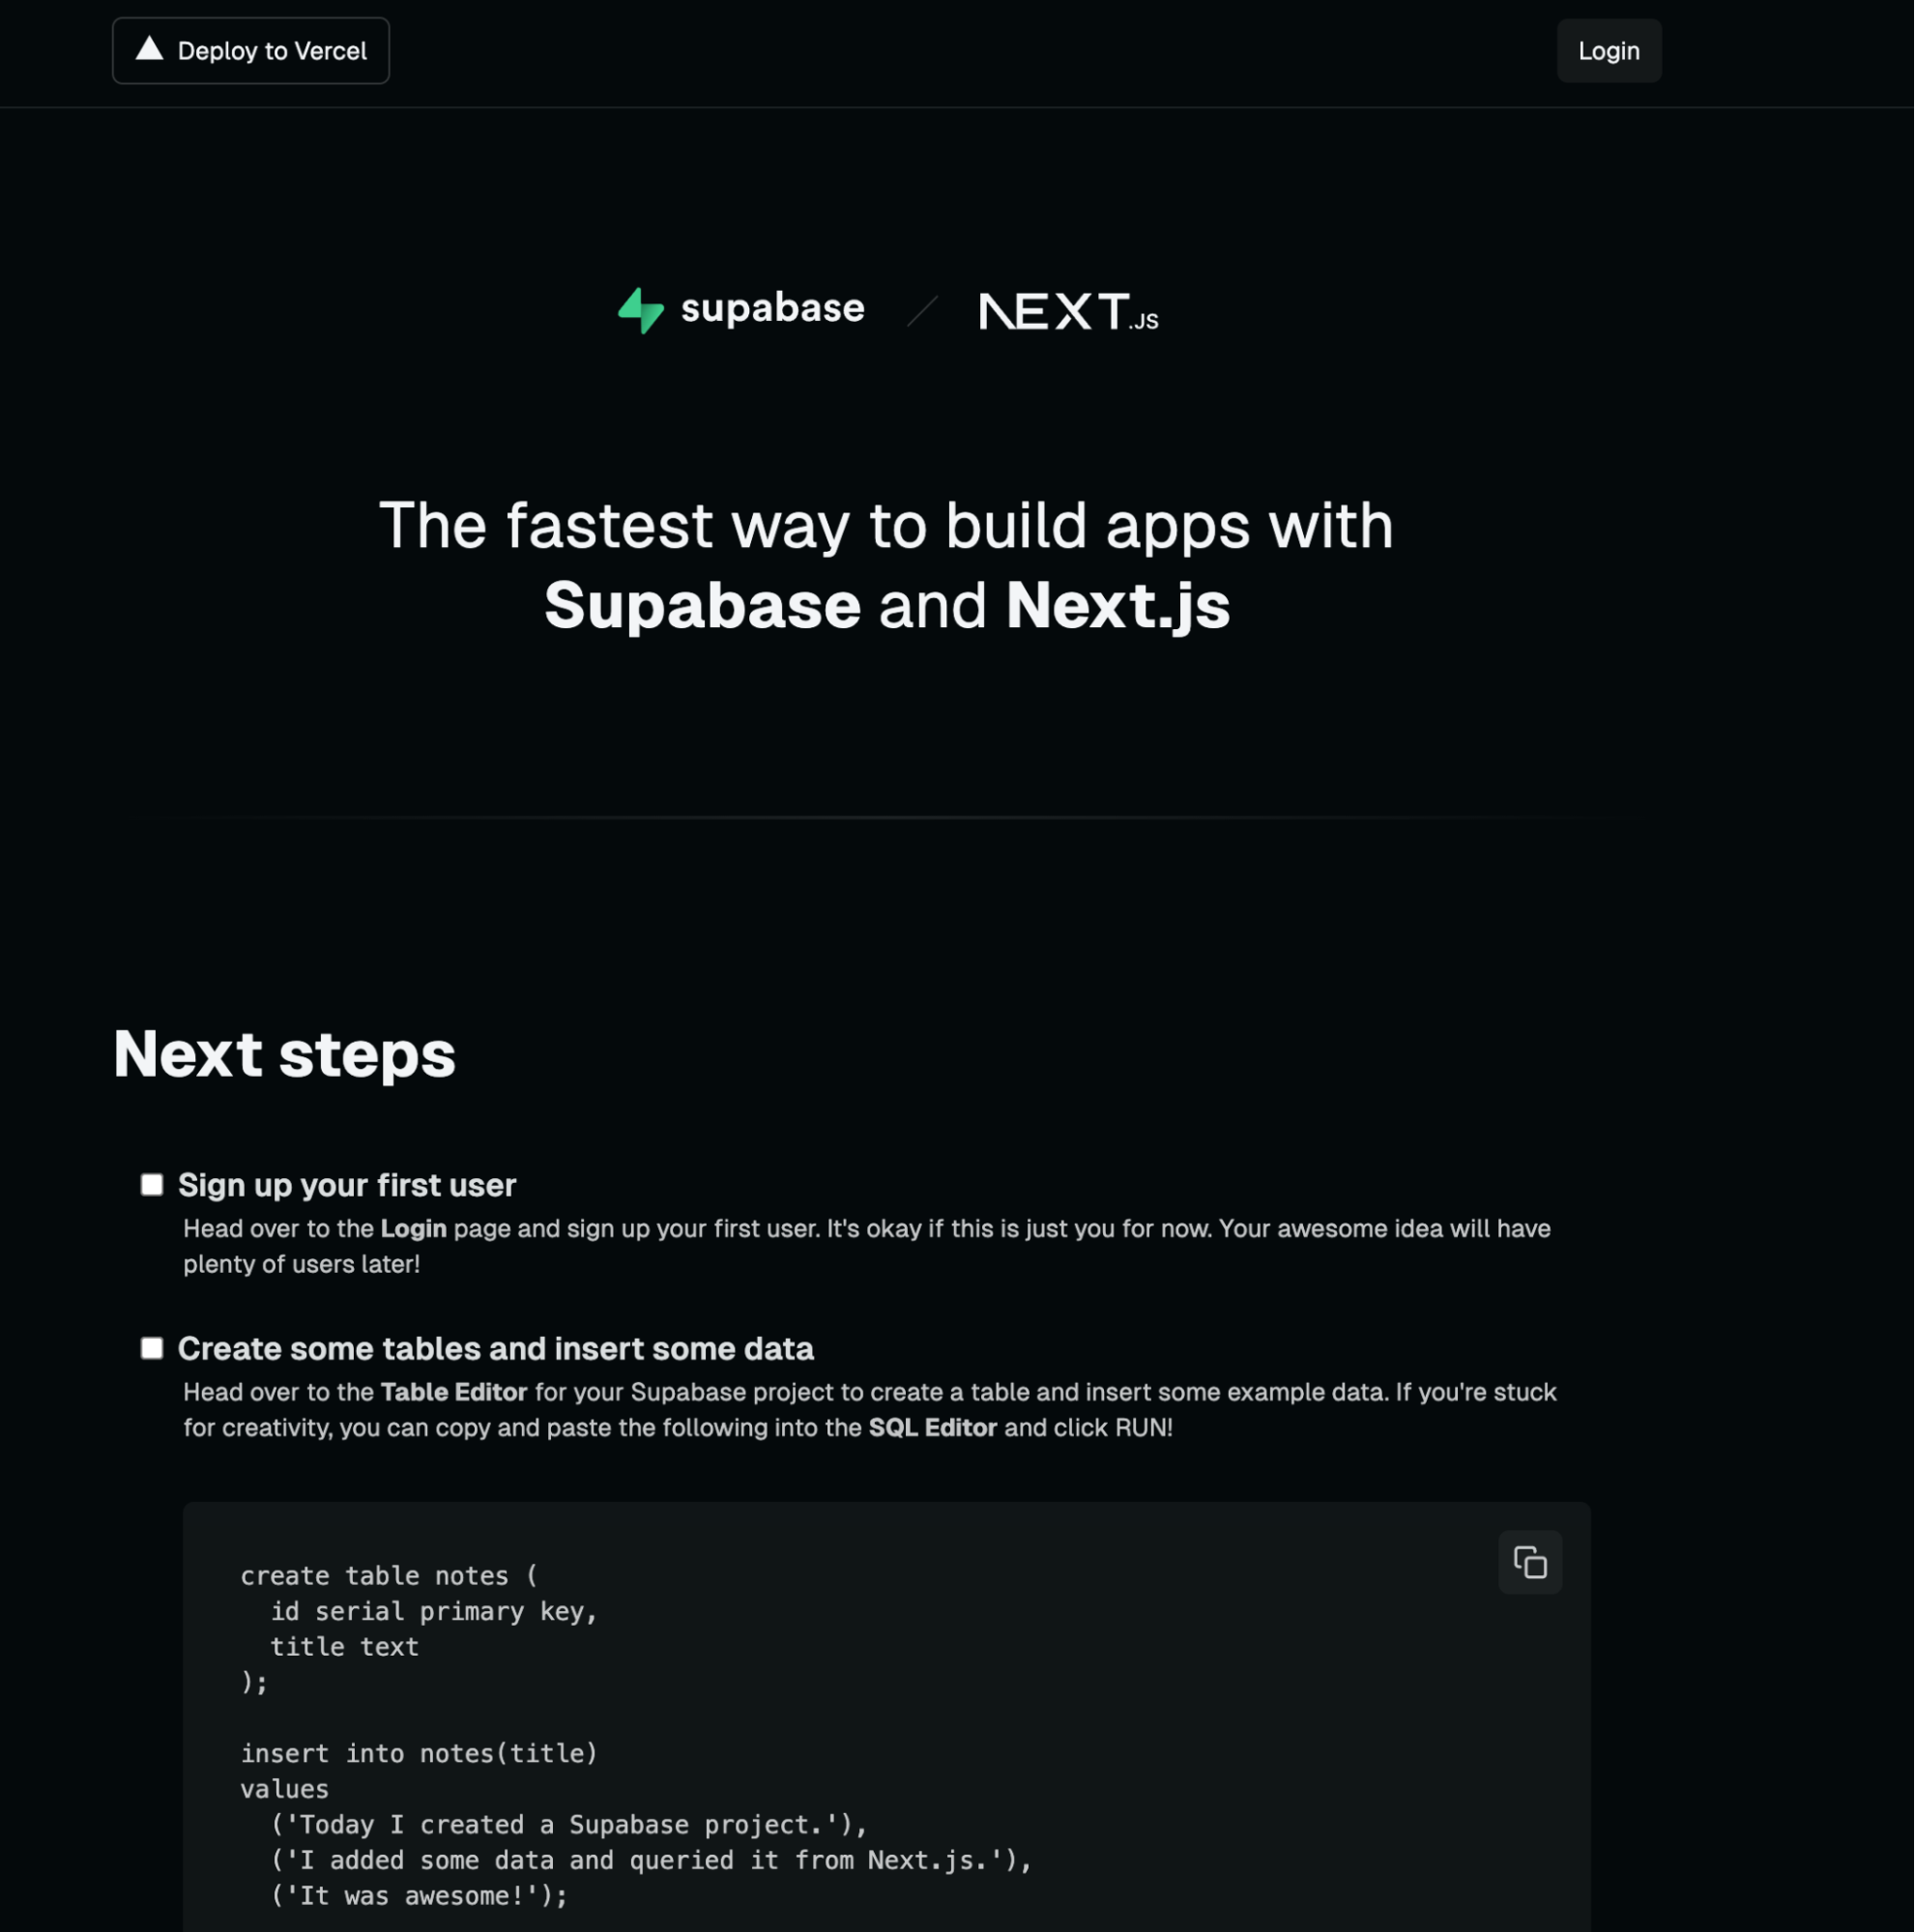
その後npm run devを実行して、下記のような画面が出ればプロジェクトの作成成功です。
認証機能の作成
①:必要なファイルの作成
今回作りたい画面に合わせてプロジェクトのファイル構成を変更しましょう。
現状のファイル構成が下記のようになっているかと思いますが、まずは不要なファイルを削除し、必要なファイルと入れ替えて行きましょう。
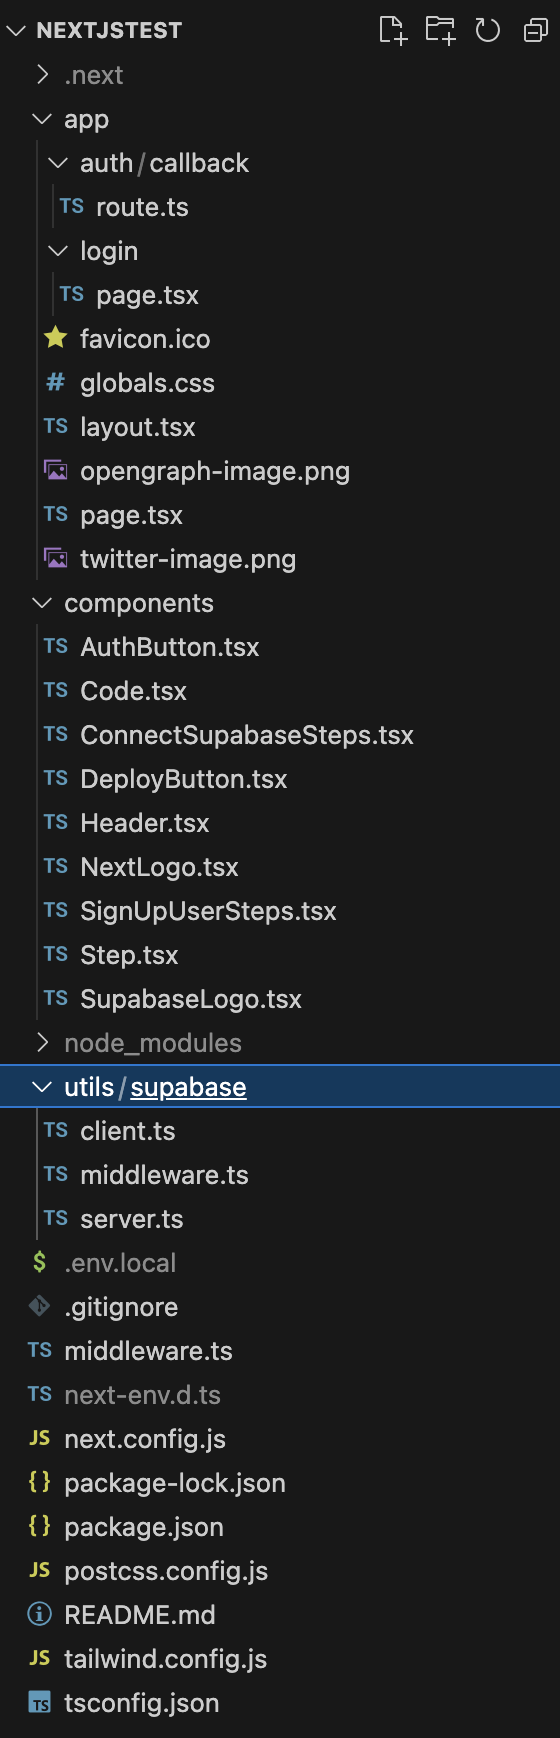
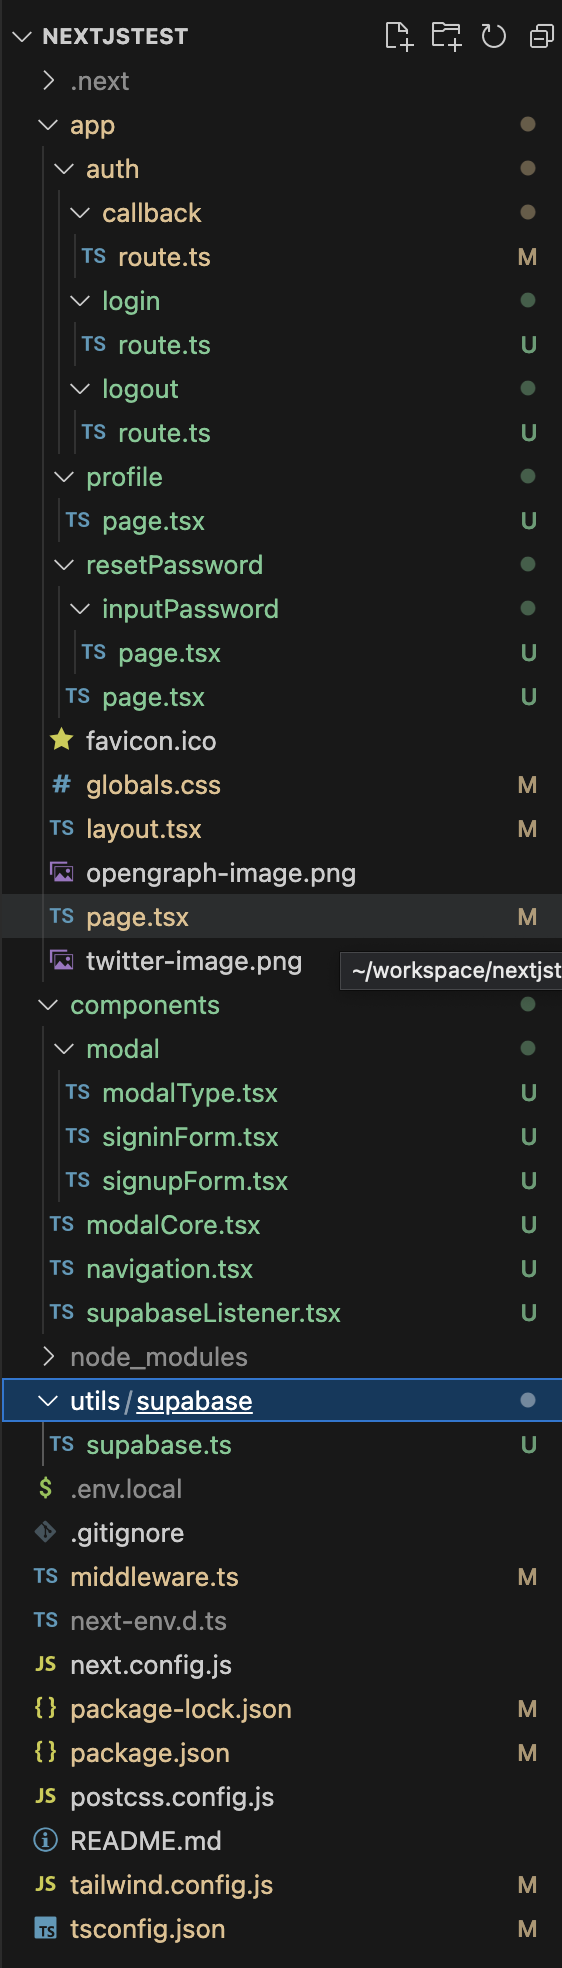
上記を下記の状態に変更します
削除するファイルは、
・app/auth/login/page.tsx
・componentsフォルダの直下すべて
・util/supabase直下すべて
になります。
ログインページ無くて大丈夫なの?と思うかもしれませんが、今回はモーダルでログインのUIを実現するため、ページとしては不要です。
作成するファイルは、
・app/auth/login/route.ts
・app/auth/logout/route.ts
・app/profile/page.tsx
・app/resetPassword/page.tsx
・app/resetPassword/inputPassword/page.tsx
・components/modalCore.tsx
・components/navigation.tsx
・components/supabaseListener.tsx
・components/modal/modalType.ts
・components/modal/signinForm.tsx
・components/modal/signupForm.tsx
・utils/supabase/supabase.ts
になります。(一旦ファイルを新規作成するのみで大丈夫です。中身は後で作ります)
多いので、一個ずつテキストを読みながら作成してみてください。
では、各ファイルの中身を作成する前に下準備から行いましょう。
②:下準備
Next.js Auth Helper Package
今回、認証機能をNext.js上で作成するにあたって、より便利に認証を扱うためにNext.js Auth Helper Packageを利用します。
これを利用することで、Next.jsのルーター(URLパス制御機能)上でどこにいてもセッションベースの認証機能が利用可能になります。
導入方法は下記のコマンドになります。
npm install @supabase/auth-helpers-nextjsutils/supabase/supabase.ts
ユーザ登録時に必要になるため、事前にsupabase.tsの中身を作成します。
import { createClient } from '@supabase/supabase-js'export const supabase = createClient(process.env.NEXT_PUBLIC_SUPABASE_URL!, process.env.NEXT_PUBLIC_SUPABASE_ANON_KEY!).env.localに入力したURLとAPIキーがここで利用されます。
③:認証周りのルーティング
認証周りのルーティングのためにapp/authに入っているroute.tsファイル群を作成していきます。
app/auth/callback/route.ts
import { NextResponse } from 'next/server'import type { NextRequest } from 'next/server'export async function GET(request: NextRequest) { const requestUrl = new URL(request.url) console.log(requestUrl.origin) return NextResponse.redirect(requestUrl.origin + '/')}こちらはユーザ登録後に送られるメールアドレス上に載っているURLにアクセスすることで発火するGETになります。
内容としてはシンプルにトップページにリダイレクトする形です。
あくまでユーザ登録確認が行えればいいため、この実装にしています。
app/auth/login/route.ts
import { NextResponse } from 'next/server'import type { NextRequest } from 'next/server'export async function GET(request: NextRequest) { const requestUrl = new URL(request.url) console.log(requestUrl.origin) return NextResponse.redirect(requestUrl.origin + '/')}ログインフォームに入力し、Submitが行われるとこちらの処理に飛びます。
ログインに利用するメールアドレス、パスワードをsupabase側のsignin処理に送っています。
問題がなければそのままプロフィール画面が表示されます。
app/auth/logout/route.ts
import { NextResponse } from 'next/server'import type { NextRequest } from 'next/server'export async function GET(request: NextRequest) { const requestUrl = new URL(request.url) console.log(requestUrl.origin) return NextResponse.redirect(requestUrl.origin + '/')}こちらはプロフィール画面でログアウトを行った際に行われる処理です。
supabase側のsignout処理を行い、トップページにリダイレクトします。
④:基本ページ作成
トップページのメイン要素や基本のレイアウトを作成します。
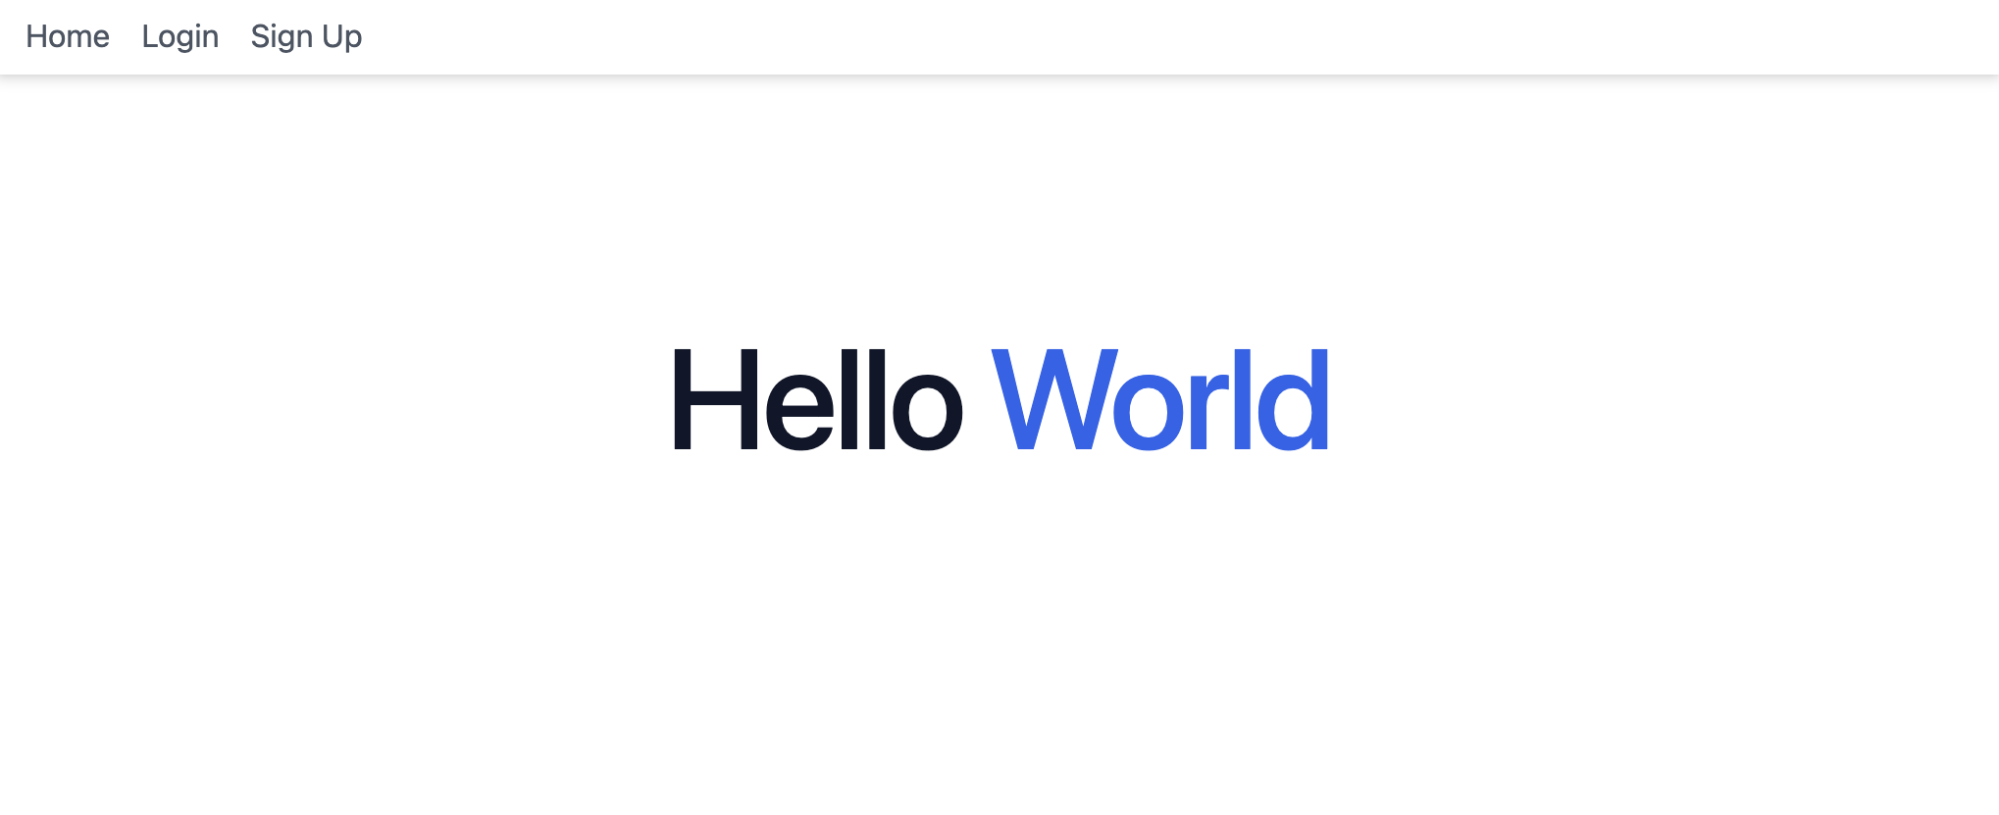
app/page.tsx
export default function Home() { return ( <main className="mx-auto max-w-7xl px-4 sm:px-6 lg:px-8 pb-16 pt-20 text-center lg:pt-32"> <h1 className="mx-auto max-w-4xl font-display text-5xl font-medium tracking-tight text-slate-900 sm:text-7xl"> Hello <span className="relative whitespace-nowrap text-blue-600"> World</span> </h1> </main> )}app/layout.tsx
import './globals.css'import SupabaseListener from '@/components/supabaseListener'export default function RootLayout({ children,}: { children: React.ReactNode}) { return ( <html lang="ja"> <body> <div> <SupabaseListener /> </div> <main>{children}</main> </body> </html> )}トップページの見た目は下記のようになります。
⑤:ユーザ登録、ログインフォーム
モーダルの共通部分と、ユーザ登録、ログインそれぞれのフォーム、加えて各フォームに切り替えるために利用する列挙型をそれぞれ作成します。
components/modalCore.tsx
import { useState } from 'react';import { ModalType } from './modal/modalType';import SignUpForm from './modal/signupForm';import SignInForm from './modal/signinForm';interface Props { modalType: ModalType;}const ModalCore = ({ modalType }: Props) => { const [showModal, setShowModal] = useState(false); let title = ""; let headerButton = ""; let formElement = <p>フォームを読み込めませんでした。</p>; switch (modalType) { case ModalType.SignIn: title = "ログインフォーム"; headerButton = "Login"; formElement = <SignInForm showModal={setShowModal}></SignInForm>; break; case ModalType.SignUp: title = "ユーザ登録フォーム"; headerButton = "Sign Up"; formElement = <SignUpForm showModal={setShowModal}></SignUpForm>; break; } return ( <> <button className="text-gray-600 hover:text-blue-600" type="button" onClick={() => setShowModal(true)} > {headerButton} </button> {showModal ? ( <> <div className="overflow-y-auto overflow-x-hidden fixed top-0 right-0 left-0 z-50 justify-center items-center w-full md:inset-0 max-h-full bg-black-rgba"> <div className="m-auto relative p-4 w-full max-w-md max-h-full"> <div className="relative bg-white rounded-lg shadow"> <div className="flex items-center justify-between p-4 md:p-5 border-b rounded-t"> <h3 className="text-xl font-semibold text-gray-900"> {title} </h3> <button type="button" className="end-2.5 text-gray-400 bg-transparent hover:bg-gray-200 hover:text-gray-900 rounded-lg text-sm w-8 h-8 ms-auto inline-flex justify-center items-center" data-modal-hide="authentication-modal" onClick={() => setShowModal(false)} > <svg className="w-3 h-3" aria-hidden="true" xmlns="http://www.w3.org/2000/svg" fill="none" viewBox="0 0 14 14" > <path stroke="currentColor" strokeLinecap="round" strokeLinejoin="round" strokeWidth="2" d="m1 1 6 6m0 0 6 6M7 7l6-6M7 7l-6 6" /> </svg> <span className="sr-only">モーダルを閉じる</span> </button> </div> <div className="p-4 md:p-5">{formElement}</div> </div> </div> </div> </> ) : null} </> );};export default ModalCore;モーダルの共通部分になります。
ユーザ登録、ログインフォームの切り替えやモーダル自身のon/off切り替えの機能が実装されています。
フォームの切り替えは引数として渡されたmodalTypeの情報をもとに行っています。
switch (modalType) { case ModalType.SignIn: title = "ログインフォーム"; headerButton = "Login"; formElement = <SignInForm showModal={setShowModal}></SignInForm>; break; case ModalType.SignUp: title = "ユーザ登録フォーム"; headerButton = "Sign Up"; formElement = <SignUpForm showModal={setShowModal}></SignUpForm>; break; }モーダルのon/offは下記の状態管理で行っています。
const [showModal, setShowModal] = useState(false);
components/modal/signupForm.tsx
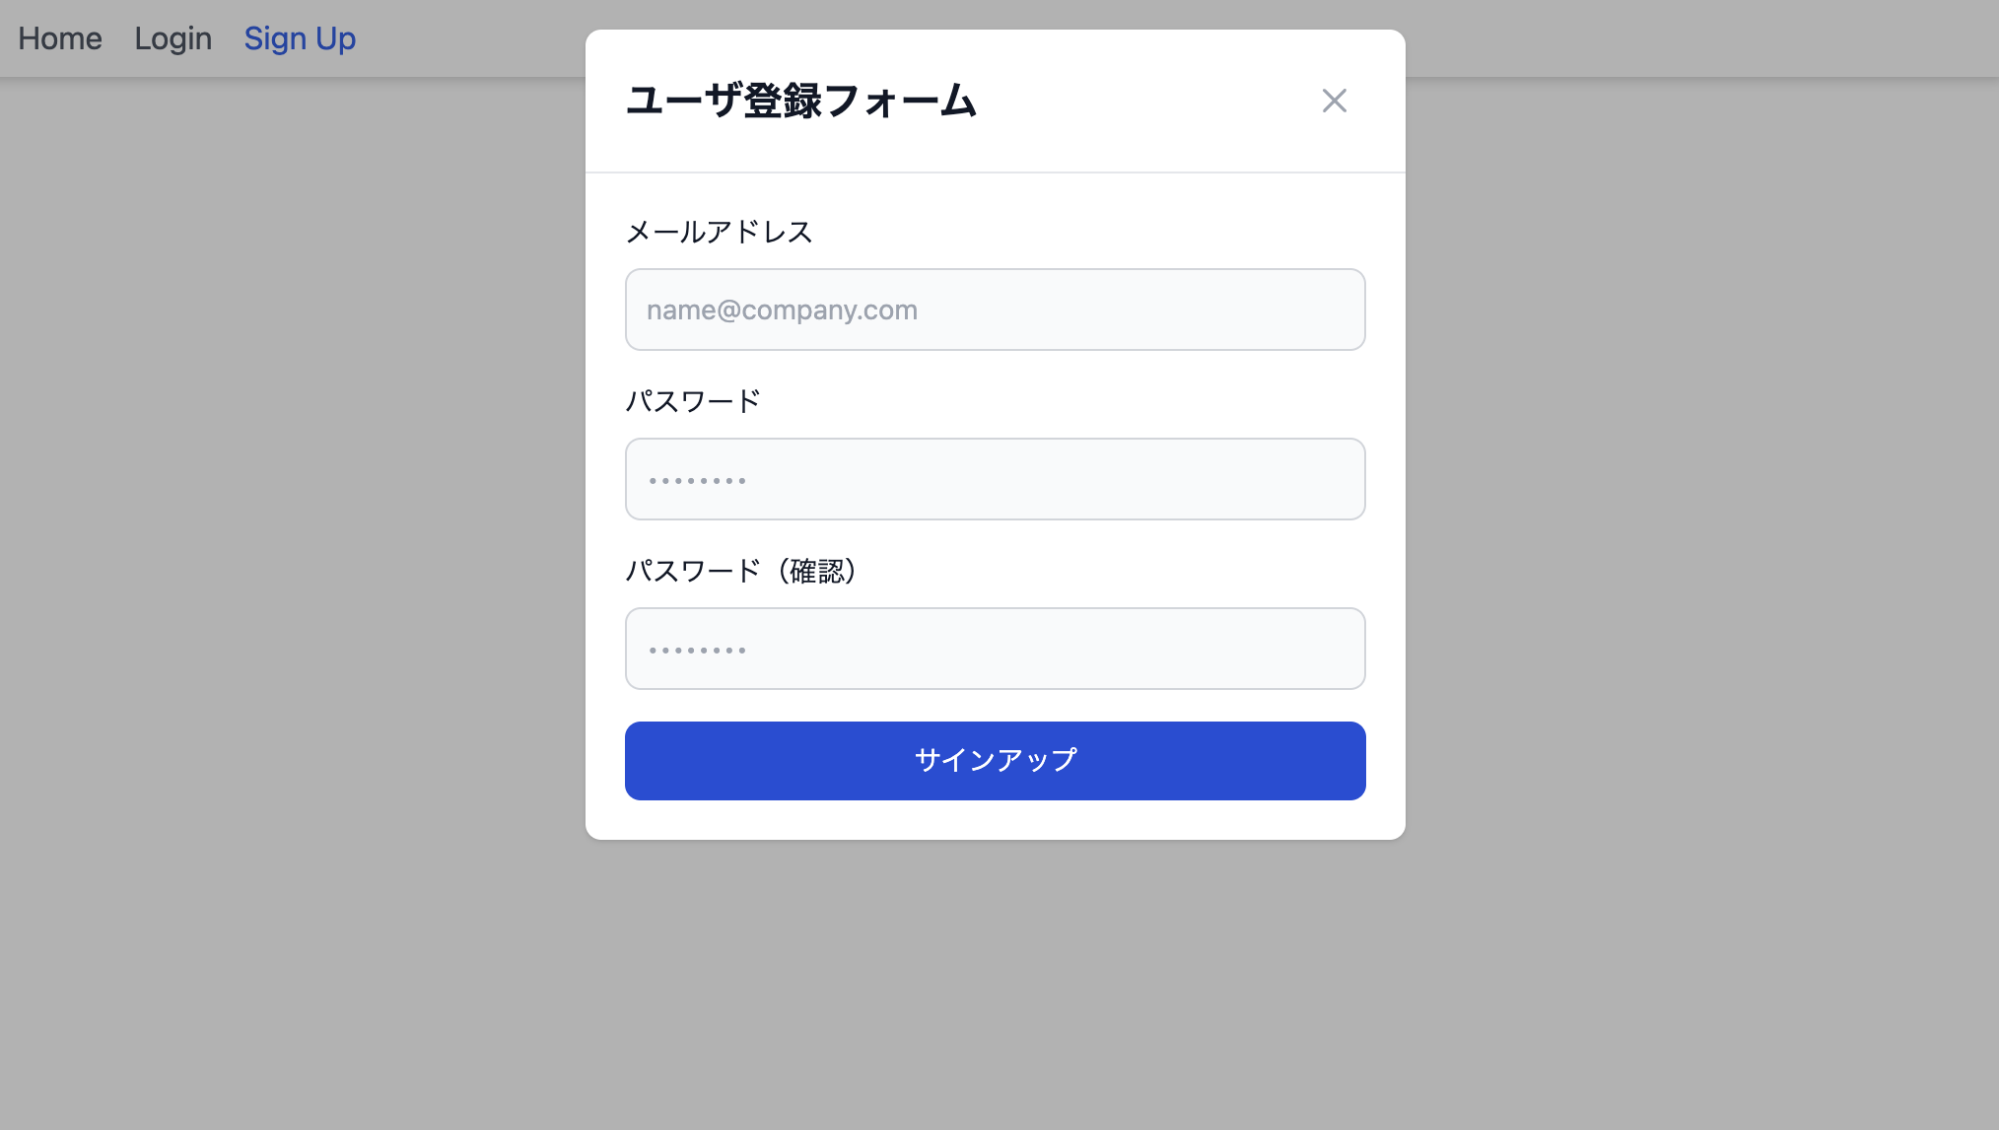
"use client";import { supabase } from "@/utils/supabase/supabase";import { useState } from "react";import { Dispatch, SetStateAction } from "react";export default function SignUpForm(props: { showModal: Dispatch<SetStateAction<boolean>>;}) { const { showModal } = props; const [email, setEmail] = useState(""); const [password, setPassword] = useState(""); const [passwordConf, setPasswordConf] = useState(""); const onSubmit = async (event: any) => { event.preventDefault(); showModal(false); try { const { error: signUpError } = await supabase.auth.signUp({ email: email, password: password, options: { emailRedirectTo: `${location.origin}/auth/callback`, }, }); if (signUpError) { throw signUpError; } alert("登録完了メールを確認してください"); } catch (error) { alert("エラーが発生しました"); } }; return ( <form className="space-y-4" onSubmit={onSubmit}> <div> <label htmlFor="email" className="block mb-2 text-sm font-medium text-gray-900" > メールアドレス </label> <input type="email" name="email" id="email" className="bg-gray-50 border border-gray-300 text-gray-900 text-sm rounded-lg focus:ring-blue-500 focus:border-blue-500 block w-full p-2.5" placeholder="name@company.com" required value={email} onChange={(e) => setEmail(e.target.value)} /> </div> <div> <label htmlFor="password" className="block mb-2 text-sm font-medium text-gray-900" > パスワード </label> <input type="password" name="password" id="password" placeholder="••••••••" className="bg-gray-50 border border-gray-300 text-gray-900 text-sm rounded-lg focus:ring-blue-500 focus:border-blue-500 block w-full p-2.5" required value={password} onChange={(e) => setPassword(e.target.value)} /> </div> <div> <label htmlFor="passwordConf" className="block mb-2 text-sm font-medium text-gray-900" > パスワード(確認) </label> <input type="password" name="passwordConf" id="passwordConf" placeholder="••••••••" className="bg-gray-50 border border-gray-300 text-gray-900 text-sm rounded-lg focus:ring-blue-500 focus:border-blue-500 block w-full p-2.5" required value={passwordConf} onChange={(e) => setPasswordConf(e.target.value)} /> </div> <div> <button type="submit" className="w-full text-white bg-blue-700 hover:bg-blue-800 focus:ring-4 focus:outline-none focus:ring-blue-300 font-medium rounded-lg text-sm px-5 py-2.5 text-center" > サインアップ </button> </div> </form> );}ユーザ登録フォームになります。
親(モーダルの共通部分)の表示on/offをフォーム側の処理に合わせて行うため、showModalを引数に渡しています。
また、
・email
・パスワード
・パスワード確認
を状態管理しており、ユーザ登録処理に利用しています。
const { showModal } = props; const [email, setEmail] = useState(""); const [password, setPassword] = useState(""); const [passwordConf, setPasswordConf] = useState("");フォームが送信されたとき、下記のようにモーダルを閉じて、supabase側のユーザ登録処理を行い、/auth/callbackのルーティングへのリンクを持つメールが送信されます。
showModal(false); try { const { error: signUpError } = await supabase.auth.signUp({ email: email, password: password, options: { emailRedirectTo: `${location.origin}/auth/callback`, }, });ユーザ登録フォームの見た目は下記のような形です。
signup処理が成功すると、Supabaseのダッシュボード→Authenticationにユーザが追加されるのがわかります。
ただ、waiting for verificationとなっており、メールを確認しないと本登録扱いになりません。

メール確認後は以下のようにサインイン日時が登録されます

components/modal/signinForm.tsx
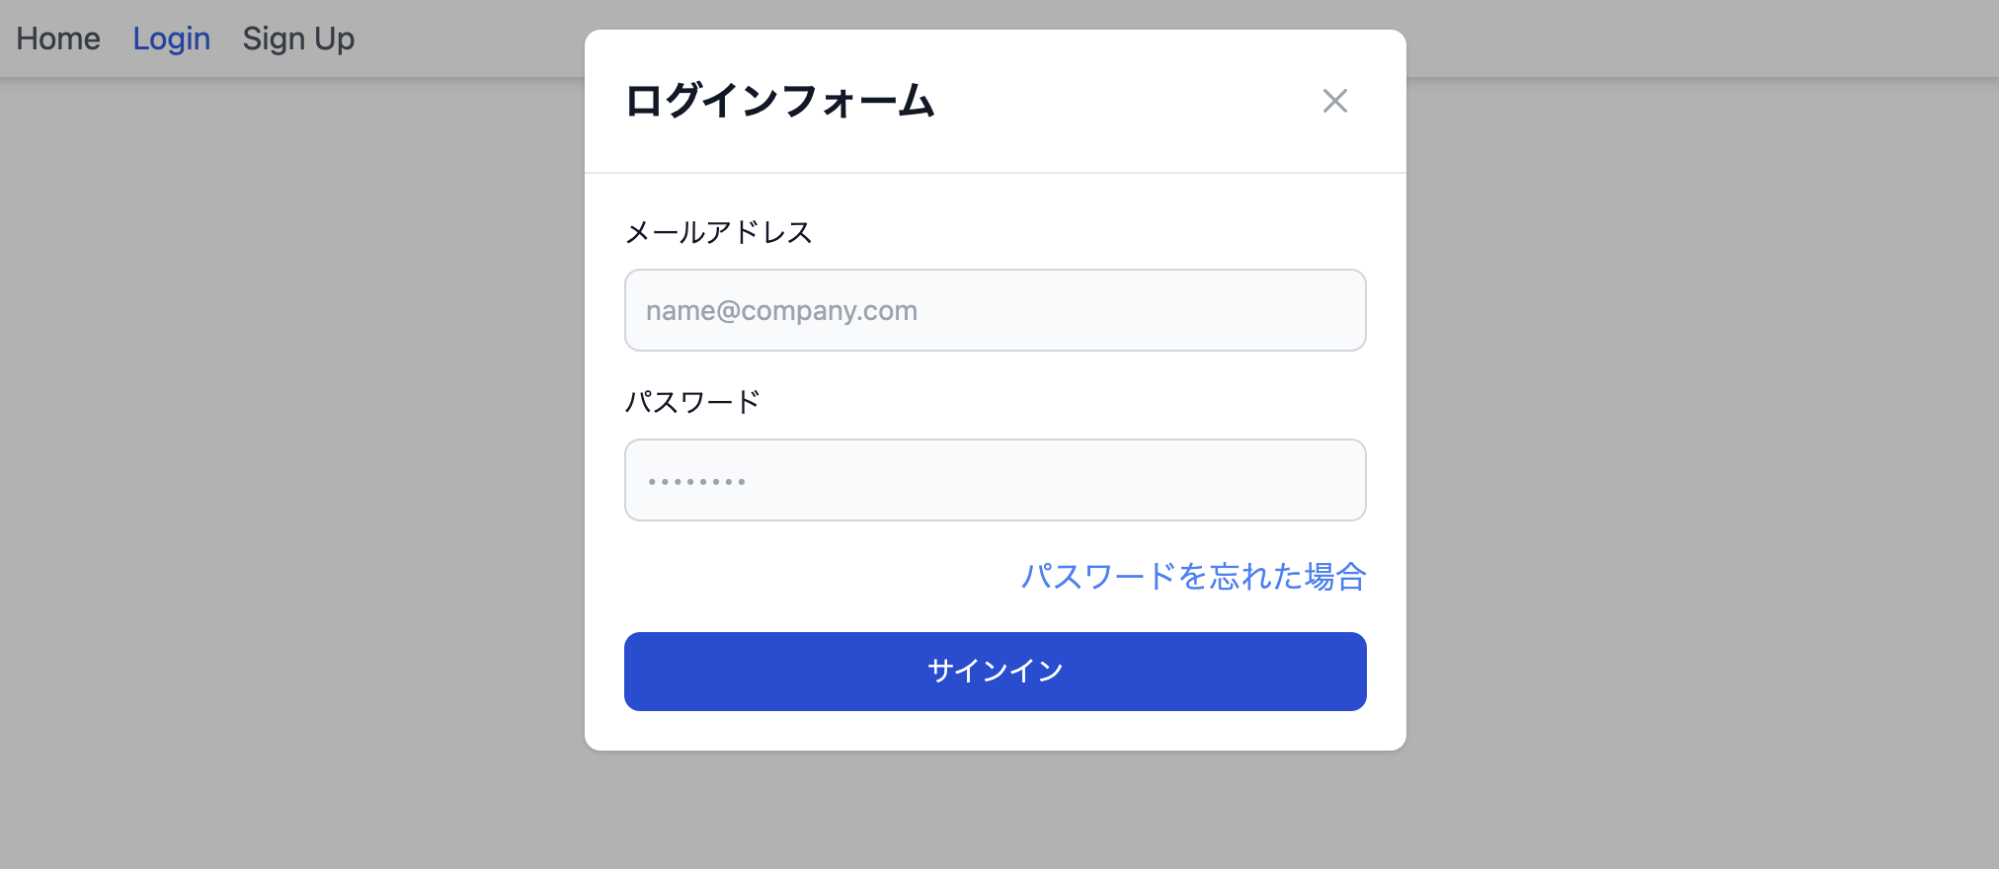
import { Dispatch, SetStateAction } from "react";import Link from 'next/link';export default function SignInForm(props: { showModal: Dispatch<SetStateAction<boolean>>;}) { const { showModal } = props; return ( <form action="/auth/login" method="post" className="space-y-4"> <div> <label htmlFor="email" className="block mb-2 text-sm font-medium text-gray-900" > メールアドレス </label> <input type="email" name="email" id="email" className="bg-gray-50 border border-gray-300 text-gray-900 text-sm rounded-lg focus:ring-blue-500 focus:border-blue-500 block w-full p-2.5" placeholder="name@company.com" required /> </div> <div> <label htmlFor="password" className="block mb-2 text-sm font-medium text-gray-900" > パスワード </label> <input type="password" name="password" id="password" placeholder="••••••••" className="bg-gray-50 border border-gray-300 text-gray-900 text-sm rounded-lg focus:ring-blue-500 focus:border-blue-500 block w-full p-2.5" required /> </div> <div className="text-right"> <Link className="font-medium text-blue-600 dark:text-blue-500 hover:underline" href={`${location.origin}/resetPassword`} onClick={() => showModal(false)}>パスワードを忘れた場合</Link> </div> <div> <button className="w-full text-white bg-blue-700 hover:bg-blue-800 focus:ring-4 focus:outline-none focus:ring-blue-300 font-medium rounded-lg text-sm px-5 py-2.5 text-center"> サインイン </button> </div> </form> );}ログインフォームの場合も同じようにshowModalが引数に渡されていますが、内部的な処理はすべてlogin/route.ts側にPOSTされます。
ログインフォームの見た目は下記のような形です。
components/modal/modalType.tsx
export enum ModalType { SignIn = 1, SignUp = 2,}シンプルに列挙型でSignInとSignUpの2つを定義しています。
フォームの切り替えに利用しています。
tailwind.config.js
フォームが開かれたときに背景を暗くするため、tailwindのコンフィグファイルにカスタムCSSを作成します。
/** @type {import('tailwindcss').Config} */module.exports = { content: [ './app/**/*.{js,ts,jsx,tsx,mdx}', './components/**/*.{js,ts,jsx,tsx,mdx}', ], theme: { extend: { colors: { 'black-rgba': 'rgba(0, 0, 0, 0.3)', }, }, }, plugins: [],}black-rgbaで定義している部分になります。
⑥:下層ページ作成
『プロフィールページ』、及び『パスワードを忘れた場合のメールアドレス入力ページ』、『パスワード再発行ページ』の作成を行います。
app/profile/page.tsx
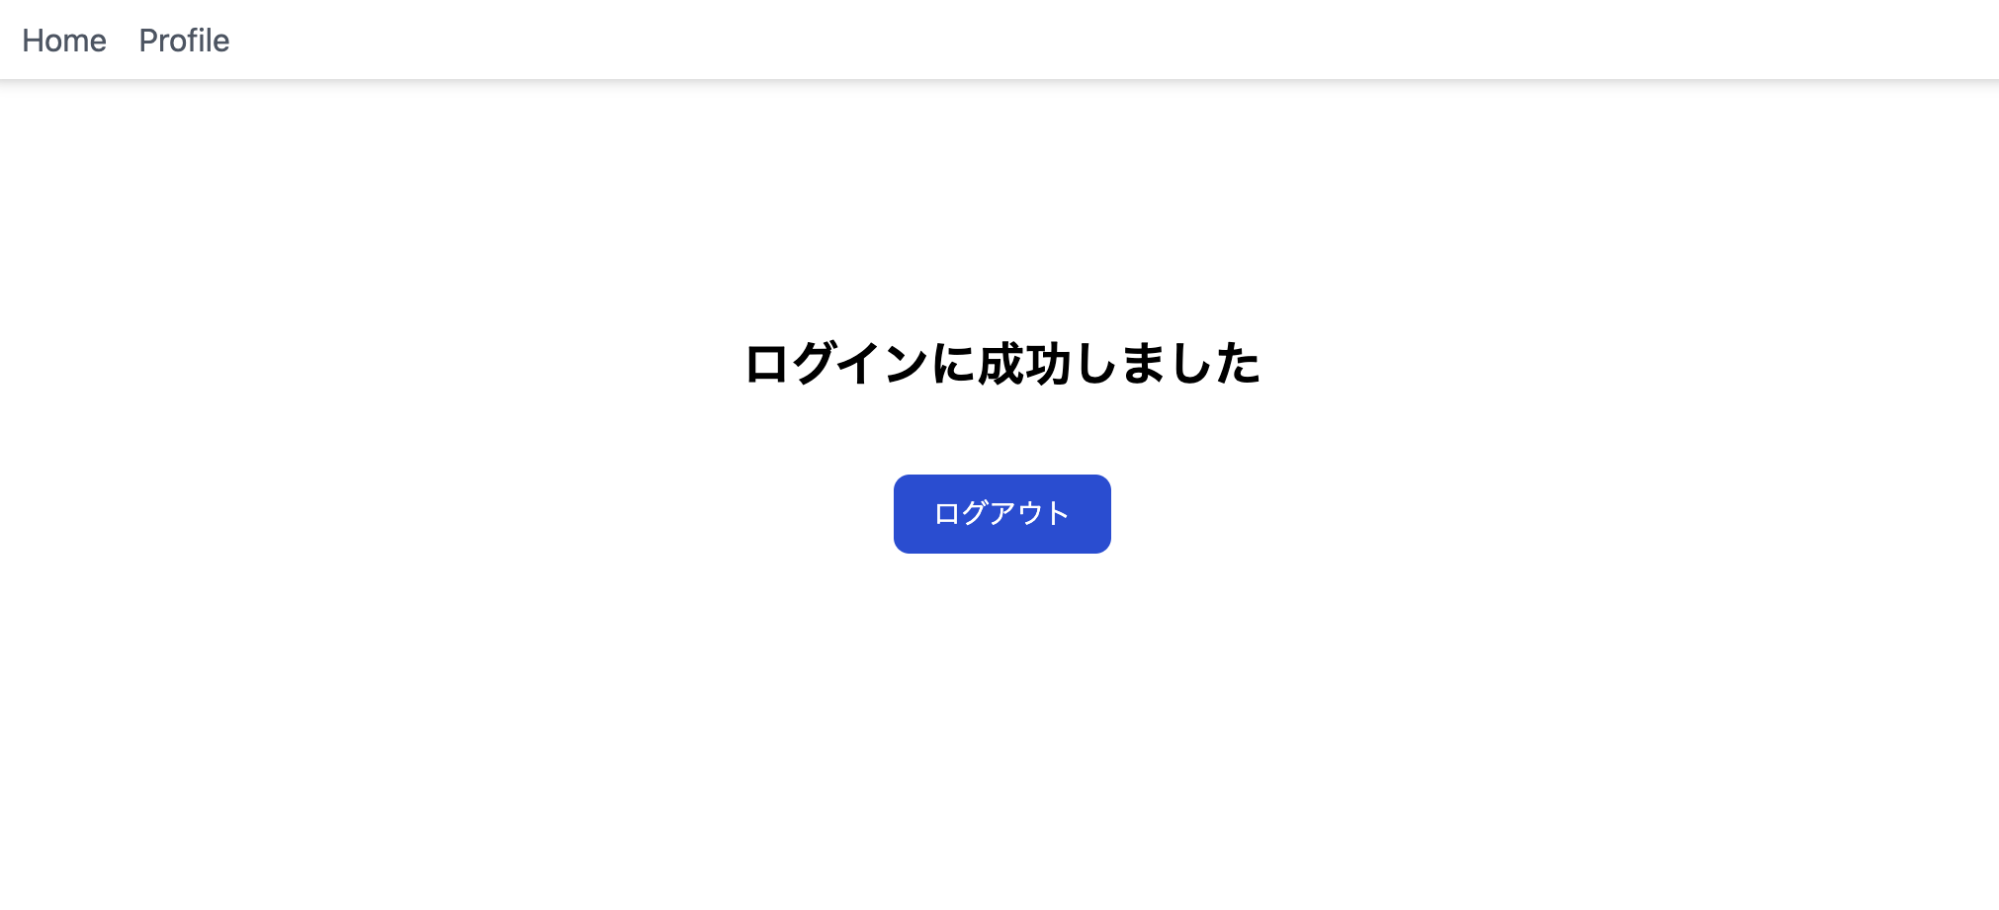
"use client"import { createClientComponentClient } from "@supabase/auth-helpers-nextjs";import { useEffect } from "react";/** * ログイン後のマイページ */const MyPage = () => { const supabase = createClientComponentClient(); useEffect(() => { async function getData() { const { data } = await supabase.auth.getSession(); console.log(data); // ... } getData(); }, []); return ( <div className="mx-auto max-w-7xl px-4 sm:px-6 lg:px-8 pb-16 pt-20 text-center lg:pt-32"> <h1 className="text-2xl font-bold"> ログインに成功しました </h1> <div className="pt-10"> <form action="/auth/logout" method="post"> <button className=" text-white bg-blue-700 hover:bg-blue-800 focus:ring-4 focus:outline-none focus:ring-blue-300 font-medium rounded-lg text-sm px-5 py-2.5 text-center" type="submit" > ログアウト </button> </form> </div> </div> )}export default MyPage;シンプルに『ログイン成功』の表示と『ログアウト』のみができるページになっています。
必要であればgetDataに更に処理を追加し、よりコンテンツを充実させてください。そうすれば、しっかりとしたプロフィールページを作ることが出来ます。
見た目は下記のような形です。
app/resetPassword/page.tsx
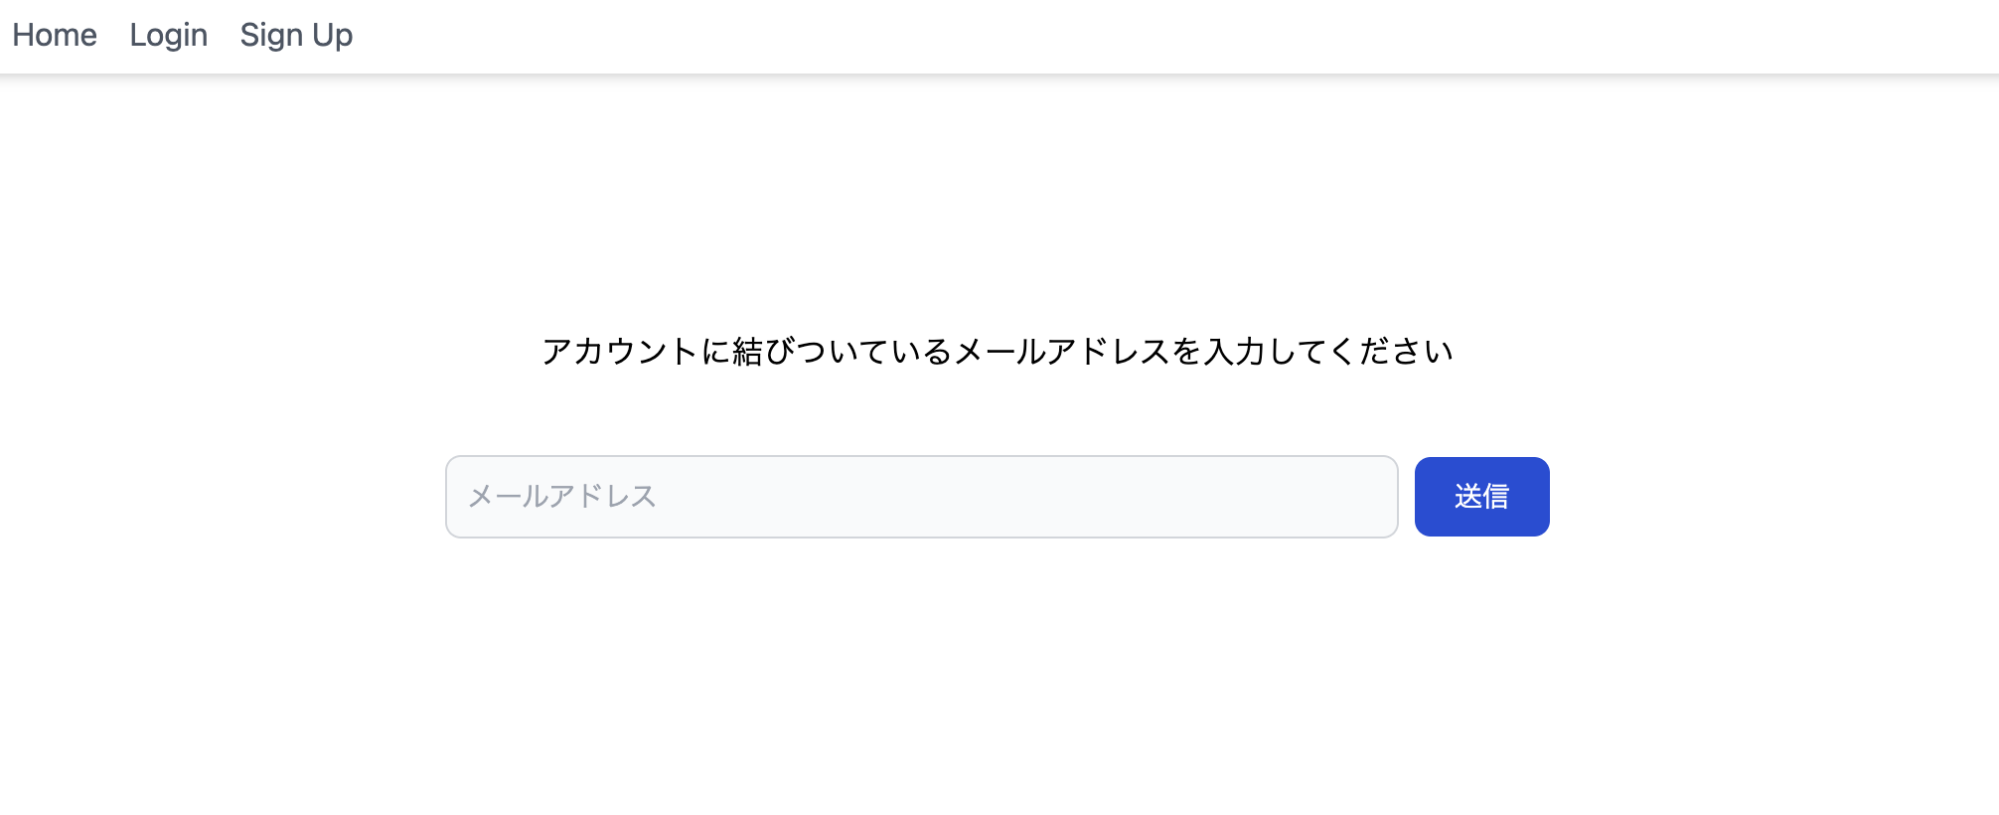
"use client"import { useState } from 'react';import { AuthError } from '@supabase/supabase-js';import { createClientComponentClient } from "@supabase/auth-helpers-nextjs";/** * パスワードリセット前のメール送信用画面 */const ResetPassword = () => { const [email, setEmail] = useState(""); const [isSend, setIsSend] = useState(false); const [error, setError] = useState<AuthError | null>(null); const onSubmit = async (event: React.FormEvent<HTMLFormElement>) => { event.preventDefault(); try { const supabase = createClientComponentClient() const { error } = await supabase.auth.resetPasswordForEmail(email, { redirectTo: `${location.origin}/resetPassword/inputPassword`, }); if (error) { setError(error); throw error; } setIsSend(true); } catch (error) { console.log(error); } }; if (error) { return ( <div className="mx-auto max-w-7xl px-4 sm:px-6 lg:px-8 pb-16 pt-20 text-center lg:pt-32"> <p>エラーが発生しました</p> </div> ) } if (isSend) { return ( <div className="mx-auto max-w-7xl px-4 sm:px-6 lg:px-8 pb-16 pt-20 text-center lg:pt-32"> <p>メールを送信しました</p> </div> ) } return ( <div className="mx-auto max-w-7xl px-4 sm:px-6 lg:px-8 pb-16 pt-20 text-center lg:pt-32"> <p>アカウントに結びついているメールアドレスを入力してください</p> <form className="pt-10" onSubmit={onSubmit}> <input className="bg-gray-50 border border-gray-300 text-gray-900 text-sm rounded-lg focus:ring-blue-500 focus:border-blue-500 md:w-2/3 lg:w-1/2 p-2.5" value={email} type="email" onChange={(e) => setEmail(e.target.value)} placeholder="メールアドレス" /> <button className="text-white bg-blue-700 hover:bg-blue-800 focus:ring-4 focus:outline-none focus:ring-blue-300 font-medium rounded-lg text-sm px-5 py-2.5 ml-2 text-center" type="submit">送信</button> </form> </div> );}export default ResetPasswordパスワードリセット処理の、一番初めにたどり着くメール送信ページになります。
const [email, setEmail] = useState(""); const [isSend, setIsSend] = useState(false); const [error, setError] = useState<AuthError | null>(null);上記のように、
・入力したメールアドレス
・メールに送信できたかどうか
・エラーが発生したかどうか
をそれぞれ状態管理し、supabaseのリセットメール送信処理と、その後のページ更新に利用しています。
リセットメール送信処理
const { error } = await supabase.auth.resetPasswordForEmail(email, { redirectTo: `${location.origin}/resetPassword/inputPassword`, });ページ更新(送信できたorエラー)
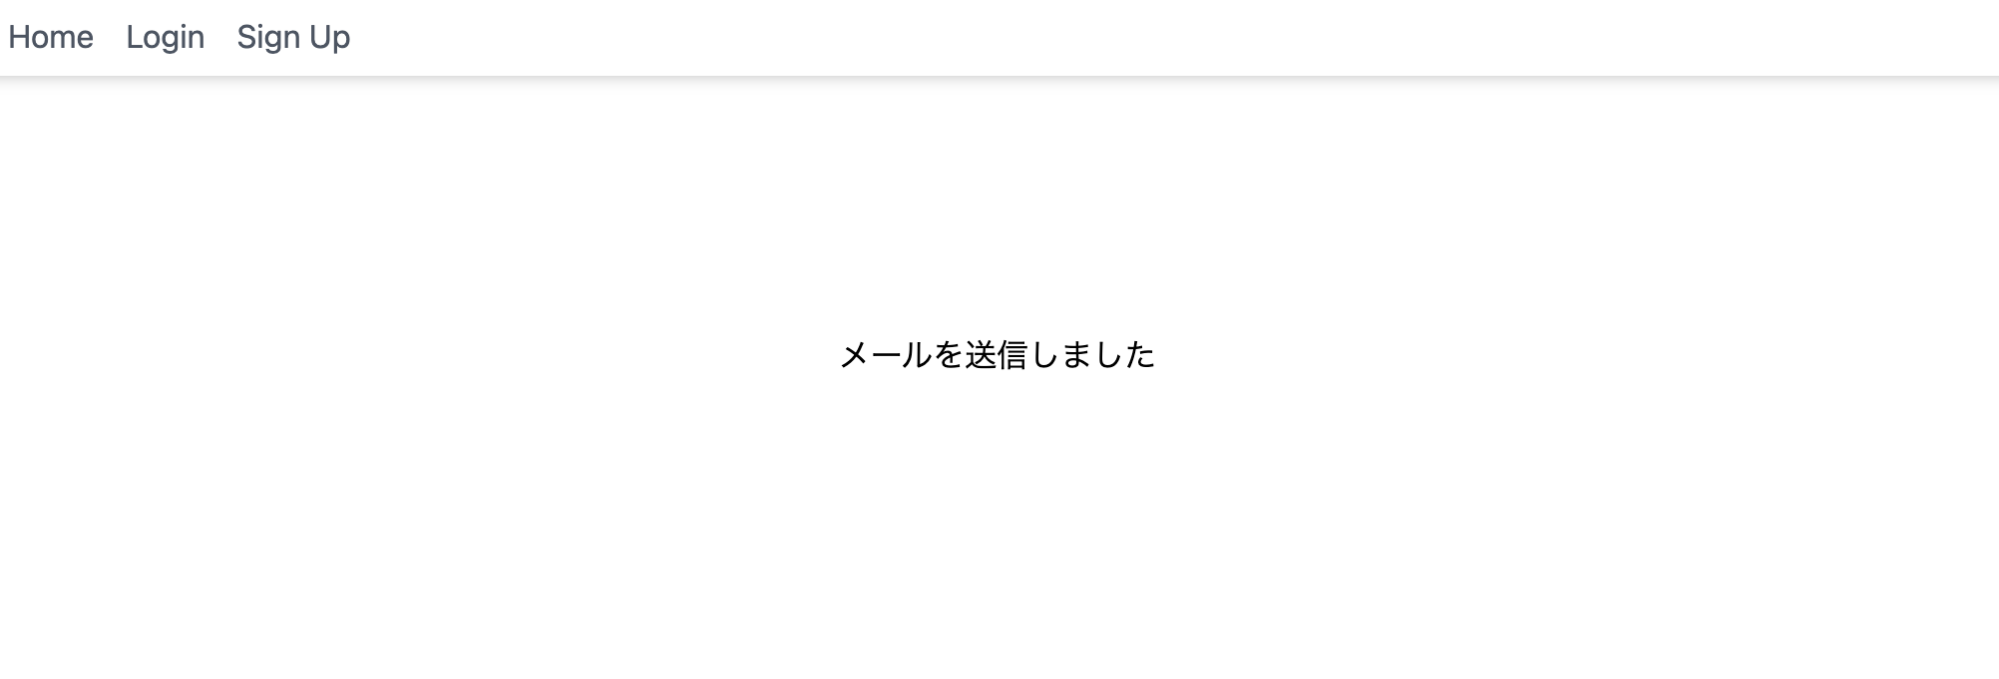
if (error) { return ( <div className="mx-auto max-w-7xl px-4 sm:px-6 lg:px-8 pb-16 pt-20 text-center lg:pt-32"> <p>エラーが発生しました</p> </div> ) } if (isSend) { return ( <div className="mx-auto max-w-7xl px-4 sm:px-6 lg:px-8 pb-16 pt-20 text-center lg:pt-32"> <p>メールを送信しました</p> </div> ) }ページの見た目は以下のようになります。
送信後:
app/resetPassword/inputPassword/page.tsx
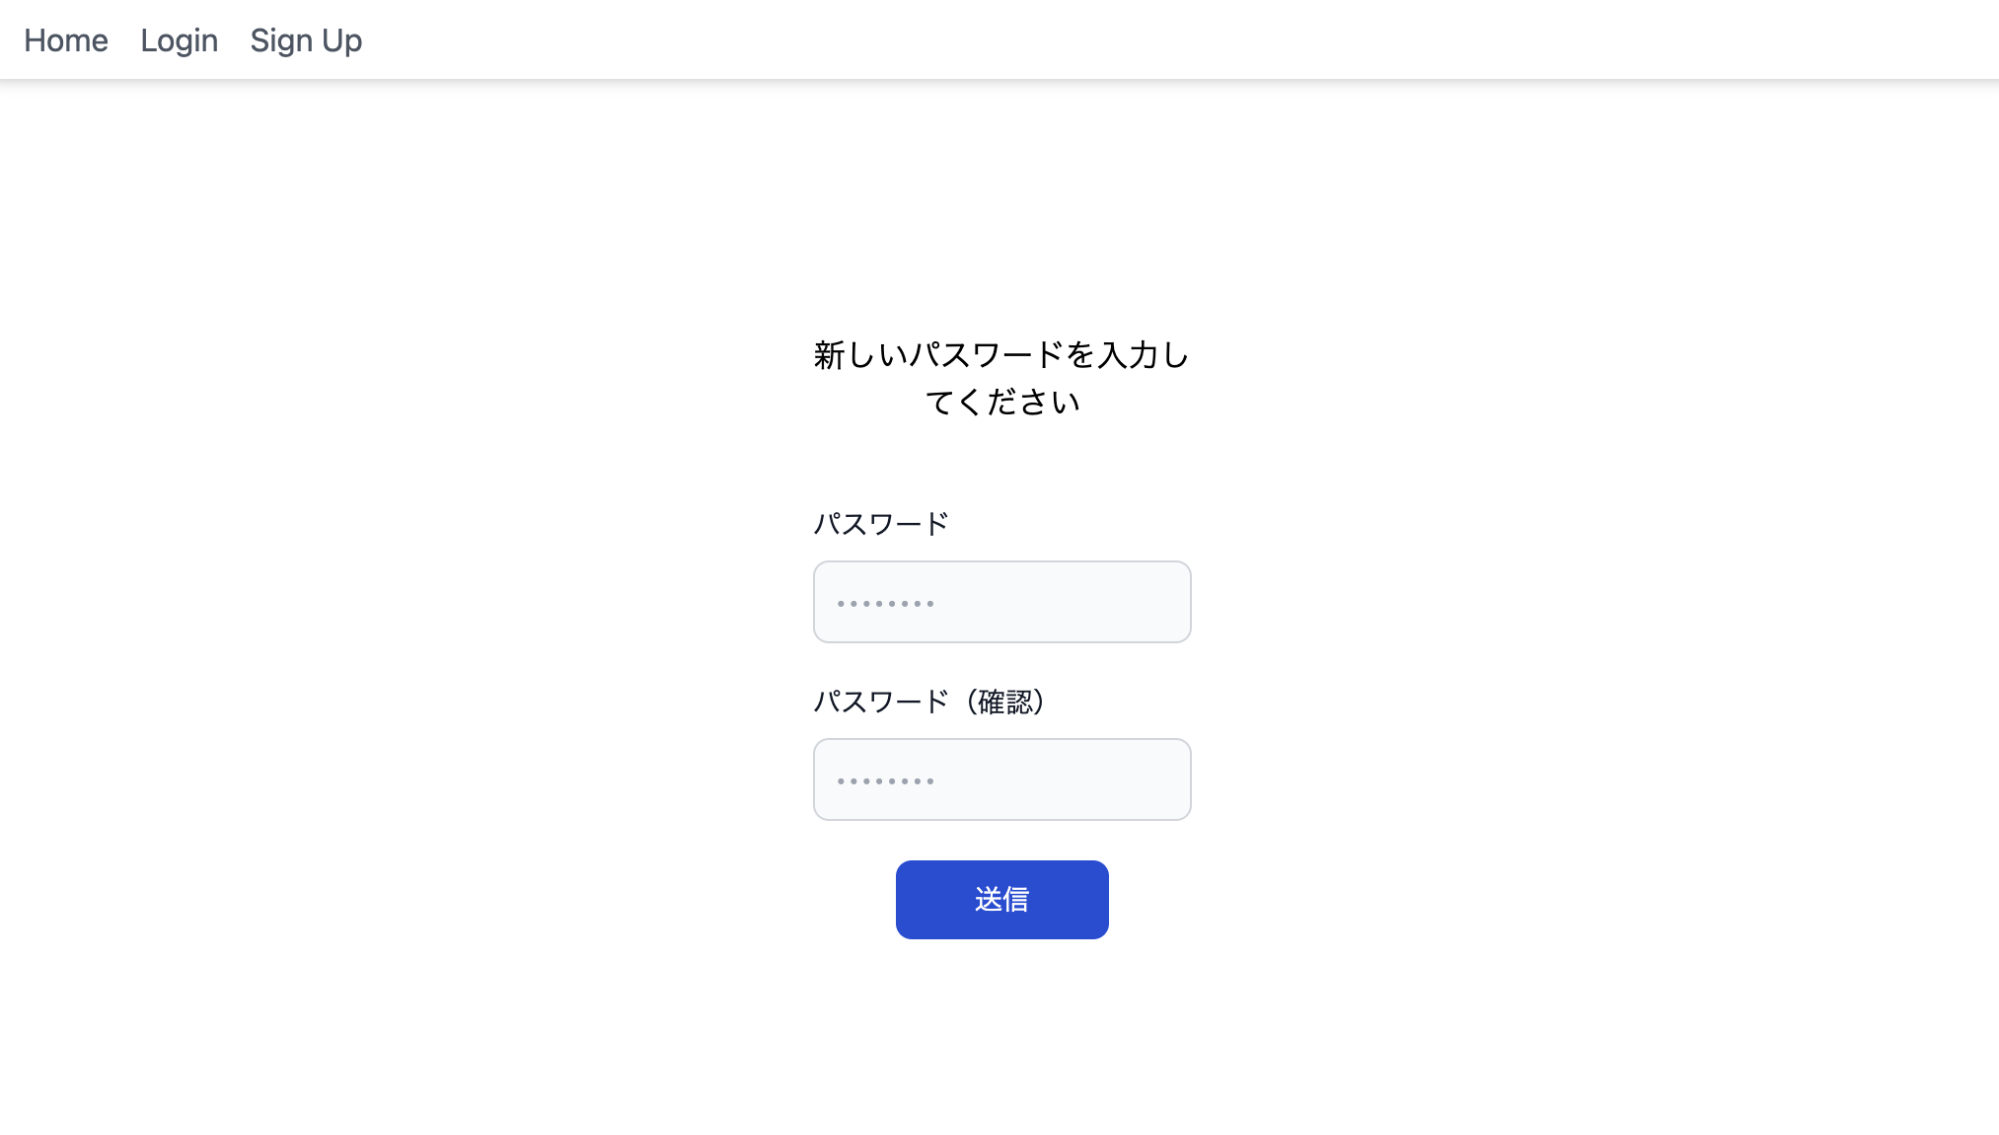
"use client"import { useState } from 'react';import { AuthError } from '@supabase/supabase-js';import { createClientComponentClient } from "@supabase/auth-helpers-nextjs";/** * パスワードリセット用画面 */const InputPasswordForReset = () => { const [password, setPassword] = useState(""); const [passwordConf, setPasswordConf] = useState(""); const [isSend, setIsSend] = useState(false); const [error, setError] = useState<AuthError | null>(null); const onSubmit = async (event: React.FormEvent<HTMLFormElement>) => { event.preventDefault(); try { const supabase = createClientComponentClient() const { error } = await supabase.auth.updateUser({ password: password }); if (error) { setError(error); throw error; } setIsSend(true); } catch (error) { console.log(error); } }; if (error) { return ( <div className="mx-auto max-w-7xl px-4 sm:px-6 lg:px-8 pb-16 pt-20 text-center lg:pt-32"> <p>エラーが発生しました</p> </div> ) } if (isSend) { return ( <div className="mx-auto max-w-7xl px-4 sm:px-6 lg:px-8 pb-16 pt-20 text-center lg:pt-32"> <p>パスワードを更新しました</p> </div> ) } return ( <div className="mx-auto max-w-7xl md:w-1/2 lg:w-1/4 px-4 sm:px-6 lg:px-8 pb-16 pt-20 text-center lg:pt-32"> <p>新しいパスワードを入力してください</p> <form className="pt-10 text-left" onSubmit={onSubmit}> <div> <label htmlFor="password" className="block mb-2 text-sm font-medium text-gray-900" > パスワード </label> <input type="password" name="password" id="password" placeholder="••••••••" className="bg-gray-50 border border-gray-300 text-gray-900 text-sm rounded-lg focus:ring-blue-500 focus:border-blue-500 block w-full p-2.5" required value={password} onChange={(e) => setPassword(e.target.value)} /> </div> <div className='pt-5'> <label htmlFor="passwordConf" className="block mb-2 text-sm font-medium text-gray-900" > パスワード(確認) </label> <input type="password" name="passwordConf" id="passwordConf" placeholder="••••••••" className="bg-gray-50 border border-gray-300 text-gray-900 text-sm rounded-lg focus:ring-blue-500 focus:border-blue-500 block w-full p-2.5" required value={passwordConf} onChange={(e) => setPasswordConf(e.target.value)} /> </div> <div className='text-center mt-5'> <button className="text-white bg-blue-700 hover:bg-blue-800 focus:ring-4 focus:outline-none focus:ring-blue-300 font-medium rounded-lg text-sm px-10 py-2.5 text-center" type="submit">送信</button> </div> </form> </div> );}export default InputPasswordForResetリセットメール送信後、そこから遷移してくるパスワード再発行ページです。
const [password, setPassword] = useState(""); const [passwordConf, setPasswordConf] = useState(""); const [isSend, setIsSend] = useState(false); const [error, setError] = useState<AuthError | null>(null);上記のように
・パスワード
・パスワード確認
・送信できたかどうか
・エラーが発生したかどうか
をそれぞれ状態管理し、supabaseのユーザ情報更新処理と、その後のページ更新(リセット時とほぼ同じ為省略)に利用しています。
supabaseのユーザ情報更新処理
const { error } = await supabase.auth.updateUser({ password: password });見た目は以下のようになります。
⑦:ナビゲーション(ヘッダー)
各ページは作成できましたが、『それぞれのページへアクセスするためのナビゲーション』と『認証機能を利用するため、セッション情報をナビゲーションに与える部分』の実装がされていません。
下記のように作成してください。
components/navigation.tsx
'use client';import type { Session } from '@supabase/auth-helpers-nextjs';import Link from 'next/link';import { usePathname, useRouter } from 'next/navigation';import ModalCore from './modalCore';import { ModalType } from './modal/modalType';const Navigation = ({ session }: { session: Session | null }) => { const pathname = usePathname(); const router = useRouter(); if (session === null && pathname?.includes('/profile')) { router.push('/'); } return ( <header> <div className="flex items-center justify-between px-4 py-2 bg-white shadow-md"> <nav className="hidden md:flex space-x-4"> <div> <Link className="text-gray-600 hover:text-blue-600" href="/"> Home </Link> </div> {session ? ( <div> <Link className="text-gray-600 hover:text-blue-600" href="/profile" > Profile </Link> </div> ) : ( <> <div> <ModalCore modalType={ModalType.SignIn}></ModalCore> </div> <div> <ModalCore modalType={ModalType.SignUp}></ModalCore> </div> </> )} </nav> </div> </header> )}export default Navigation各ページへのナビゲーション部分。ページのUI上はヘッダーになります。
各ページやモーダルへのアクセスを行うための記述です。
更に加えて、プロフィールページへ『セッション情報無し』でアクセスした際に、トップページへリダイレクトさせる処理も実装されています。
if (session === null && pathname?.includes('/profile')) { router.push('/'); }
components/supabaseListener.tsx
import { createServerComponentClient } from "@supabase/auth-helpers-nextjs"import { cookies } from "next/headers"import Navigation from "./navigation"const SupabaseListener = async () => { const supabase = createServerComponentClient({ cookies }) const { data: { session }, } = await supabase.auth.getSession() return <Navigation session={session} />}export default SupabaseListener;上記でnavigation.tsxにセッション情報を渡しています。
これでNext.js+Supabaseの認証機能の作成は完了です!
npm run devしてちゃんとユーザ登録、ログイン、パスワード再設定が動いていることを確認してみてください。
よりSupabaseへの理解が深まると思います。
ここまで掲載したコードについては、github上でも公開しております。
万一動かない場合等は、ご自身の構成と見比べてみてください。
なおTodoONada株式会社では、Supabaseやシステム開発等についてのノウハウ記事を数々ご用意しています。
ぜひこちらも御覧ください!
お問合せ&各種リンク
お問合せ:GoogleForm
ホームページ:https://libproc.com
運営会社:TodoONada株式会社
Twitter:https://twitter.com/Todoonada_corp
Instagram:https://www.instagram.com/todoonada_corp/
Youtube:https://www.youtube.com/@todoonada_corp/
Tiktok:https://www.tiktok.com/@todoonada_corp
presented by

- この記事にいいね!する


この記事を書いた人


- 30いいね!
稼働ステータス
◎現在対応可能
- 土門 大貴
職種
エンジニア
システムエンジニア(SE)
希望時給単価
10,000円~30,000円
▼実績例 ・公共インフラ事業者様向け管理システム開発(Windows、Python、PostgreSQL) ・官公庁様向け地図情報アプリのインフラ開発(Windows、PostgreSQL) ・自治体様向けポイント管理サービスのAPI開発(Linux、PostgreSQL、JS、Python) ・大手製造業様向けクラウド環境開発支援(AWS全般、Terraform) ・公共事業様向け顔認証決算システム基盤開発(Windows、PostgreSQL、JS、Python) ・リース業様向け代理店向けWebAPI開発(AWS全般、GoLang、JS) ・通販サイトインフラ構築支援、要件定義~開発(AWS, ECCube) ・結婚相談所様向けオウンドメディア制作(WordPress、JS、ウェブディレクトションな)
スキル
Python
AWS
React
・・・(登録スキル数:6)
スキル
Python
AWS
React
・・・(登録スキル数:6)